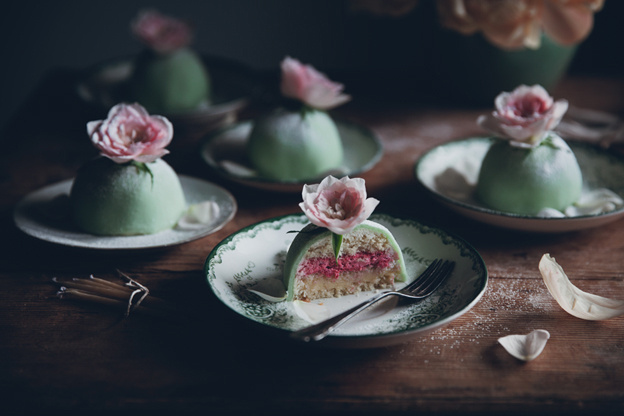
Princess cake has been on my to-do list for a while now. Since last summer I think, but I never got around to making one. I’ve eaten so many slices of princess cake in my life and I figured it was high time to make my own. Princess cake is one of the most typical Swedish pastries, and I’ve been very into making Swedish pastries lately. I know there is always some debate as to whether a real princess cake should contain raspberry jam or not. Nowadays they usually always do, as far as I know. I chose to go with raspberry cream instead of jam, because why not? Raspberries are delicious. As they’re not really in season right now, I went for frozen ones.
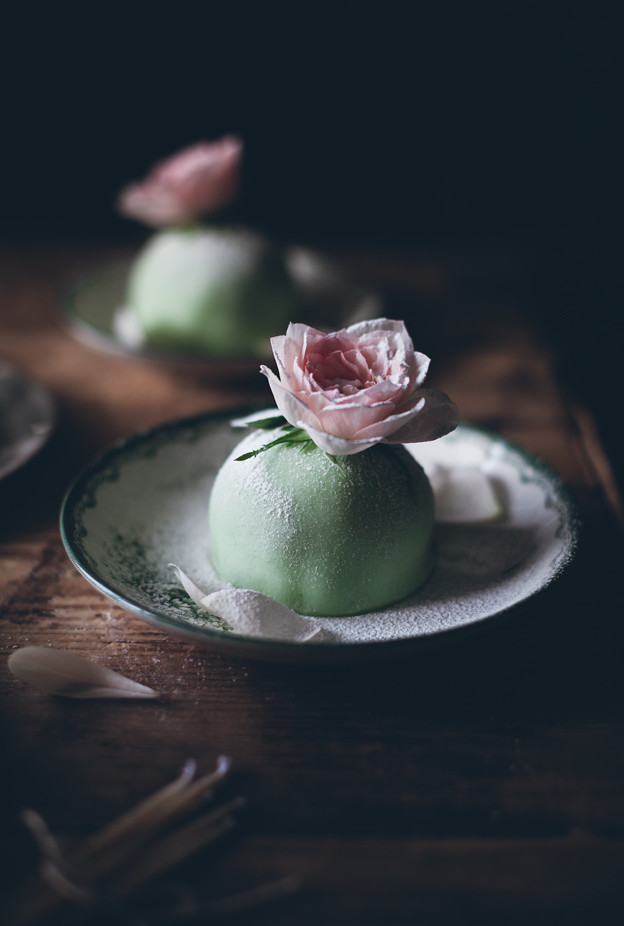
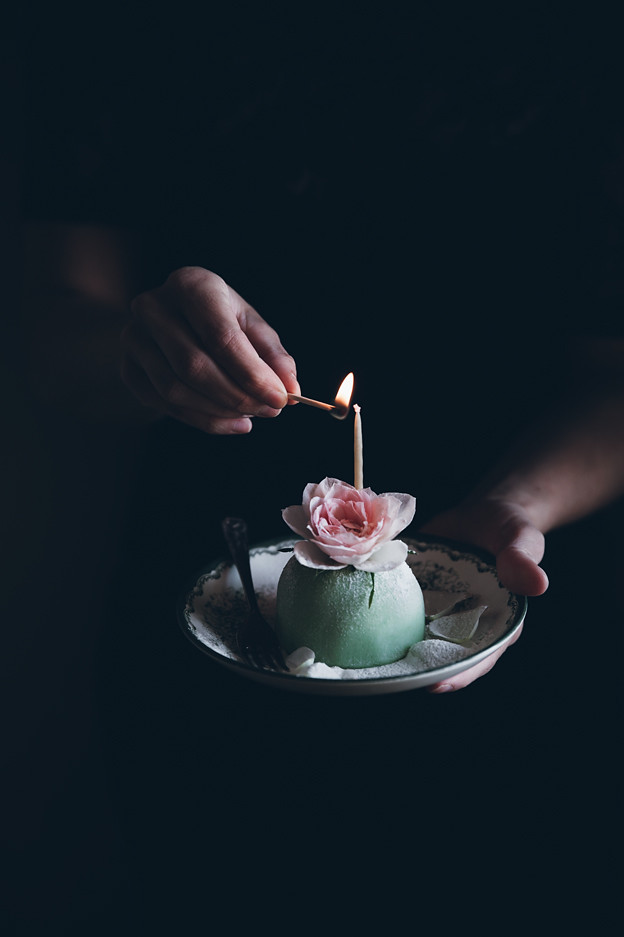
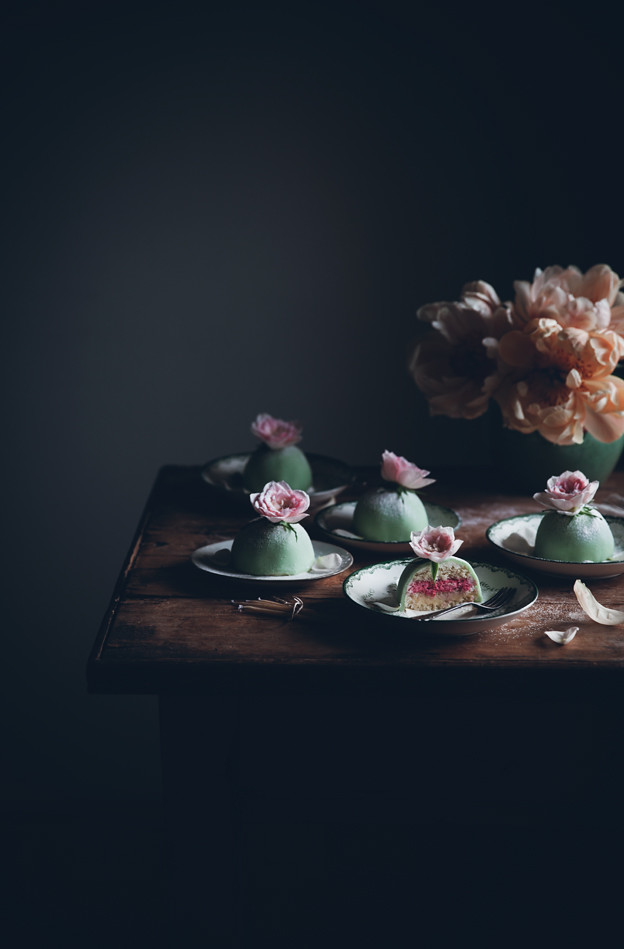
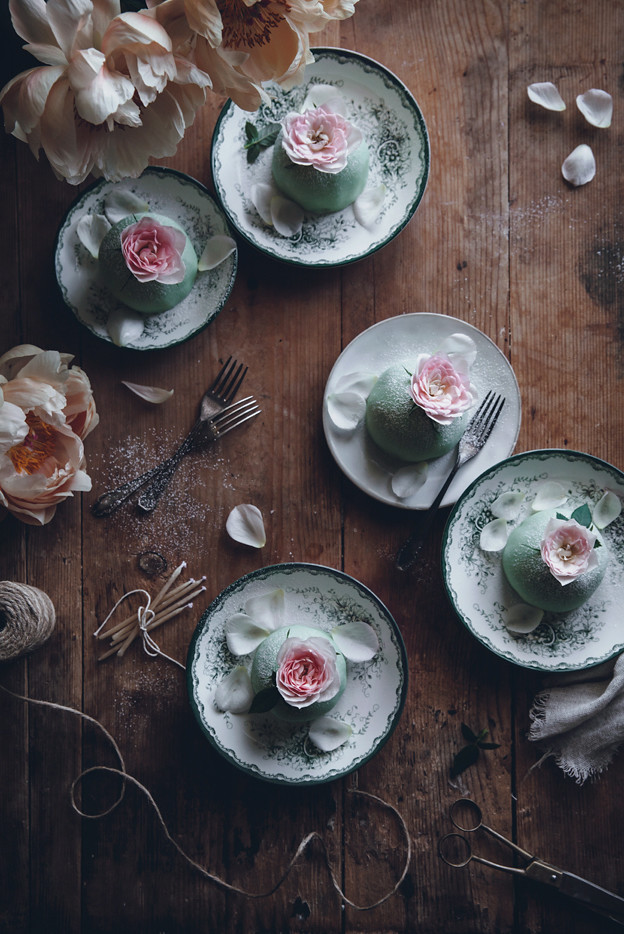
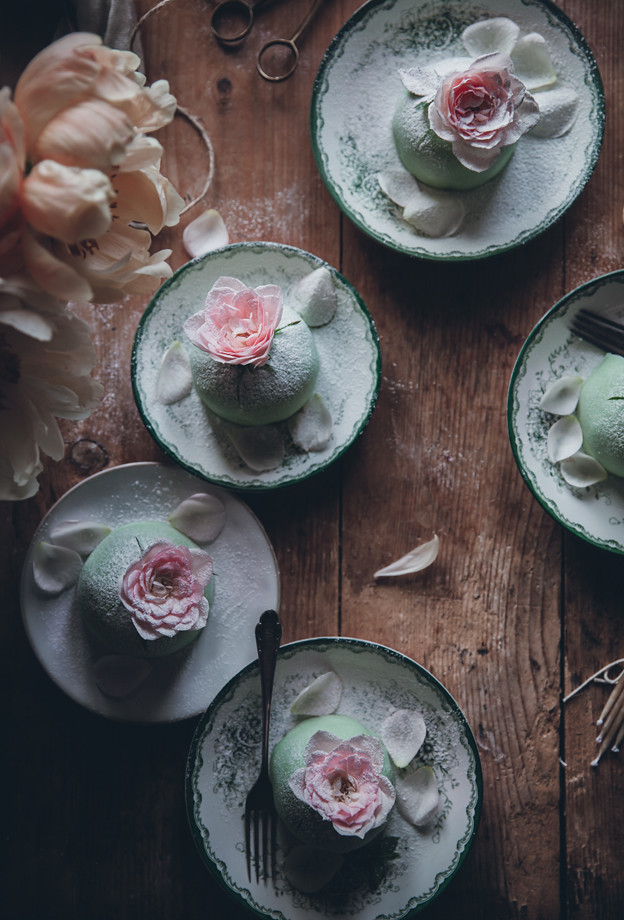
And if I can, I always go for mini format. It does take a bit longer but aren’t they adorable? Totally worth it in my opinion, to be able to serve individual little cakes for your guests.
And what’s not to like? A light sponge, pastry cream, raspberry cream with a hint of lemon, more whipped cream and marzipan. They are actually lighter than you would think despite all that cream, and they aren’t overly sweet. Delicious.
MINI PRINCESS CAKES
Makes 10 small cakes
Notes on this recipe
-Sponge cakes can be prepared 1-2 days in advance as long as they are stored in airtight containers, pastry cream can be made one day in advance. The finished cakes taste best the first two days.
-Don’t use the marzipan that you buy already rolled out, it’s way too stiff and thick to cover these tiny cakes. Believe me, I tried (so much for being lazy..)!
-Marzipan tends to dry out quickly, if this happens, wet your hands ever so slightly with some water and knead until smooth again.
-It can be difficult to roll out all of the marzipan at once, especially to get the thickness even. My advice is to roll out half the marzipan, cover 5 cakes, and then do the rest.
Ingredients
Sponge cakes
3 tbsp + 1 tsp (30 g) all purpose flour
3 tbsp + 1 tsp (40 g) potato starch
1/2 tsp baking powder
pinch of salt
2 large eggs
1/3 cup + 1 1/2 tbsp (90 g) granulated sugar
1/8 tsp vanilla powder
Pastry cream
(makes 1 cup, a bit more than you need)
1 cup (250 ml) milk
1/2 vanilla bean
3 tbsp (45 g) granulated sugar
2 tbsp (17 g) cornstarch
pinch of salt
1 large egg
1 egg yolk
Raspberry cream
75 g raspberries, fresh or frozen (thawed)
1 tbsp granulated sugar
finely grated zest from 1/2 lemon
1/4 cup (60 ml) heavy whipping cream
Topping
1 2/3 cup (400 ml) heavy whipping cream
2 tsp granulated sugar
350 g marzipan
green food coloring, if desired
powdered sugar, for dusting
Directions
Sponge cakes
1. Preheat oven to 175°C (350°C). Prepare a cupcake pan with 10 cupcake liners.
2. In a medium bowl, stir together flour, potato starch, baking powder and salt with a fork (to get rid of any lumps).
3. In a large bowl, beat eggs, sugar and vanilla until light and fluffy – about 2-3 minutes.
4. Fold in the dry ingredients and stir until batter is smooth.
5. Divide the batter between the 10 cupcake liners, filling them about 2/3 full.
6. Bake for 15-16 minutes or until a cake tester comes out clean. Let cool completely.
Pastry cream
1. Put milk in a saucepan. Scrape the seeds out of
the vanilla bean and add seeds and bean to the saucepan. Cook over medium heat until mixture comes to a boil. Remove from heat.
2. In a medium bowl, whisk together sugar, cornstarch, salt, egg and egg yolk. Slowly whisk in half of the hot milk to temper the eggs. Pour everything back into the saucepan and remove the vanilla bean.
3. Whisk over medium heat until the mixture becomes very thick. Put the saucepan in a cold water bath, stirring every now and then to prevent a skin from forming. When mixture is cool, pour into a clean bowl and cover with plastic wrap, pressing the plastic wrap against the surface of the cream. Put bowl in the fridge.
Raspberry cream
1. In a bowl, mash the raspberries with sugar and lemon zest. Set aside about 2 tbsp of the mixture for brushing the cakes.
2. In a medium bowl, beat 1/4 cup cream until stiff peaks form. Add the raspberry mixture (not the reserved 2 tbsp) and stir until smooth.
Assembly
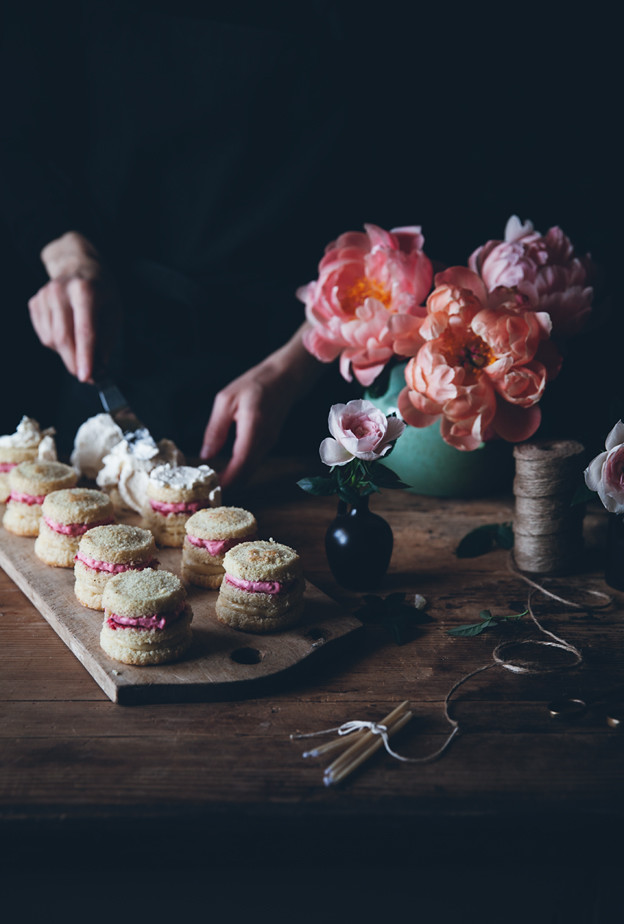
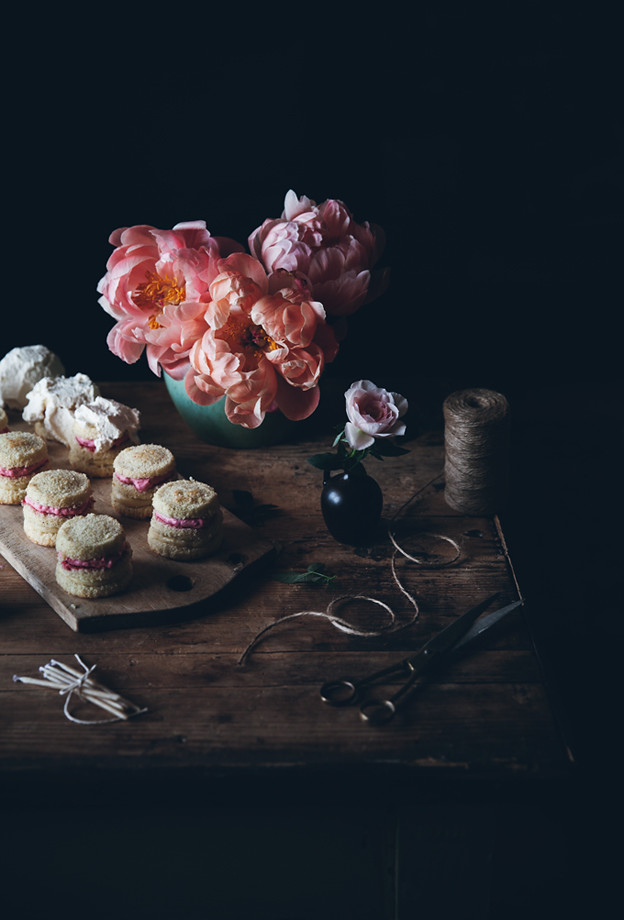
1. Remove the cupcake liners from the cupcakes. Cut each cupcake into three layers.
2. Put the widest layers (the “top” of the cupcake) on small plates or a cutting board. Pipe or spread a layer of pastry cream onto the first cake layers. Put the second layers on top and brush with the reserved raspberry mixture. Pipe or spread a layer of the raspberry cream over. Put the last layers on top.
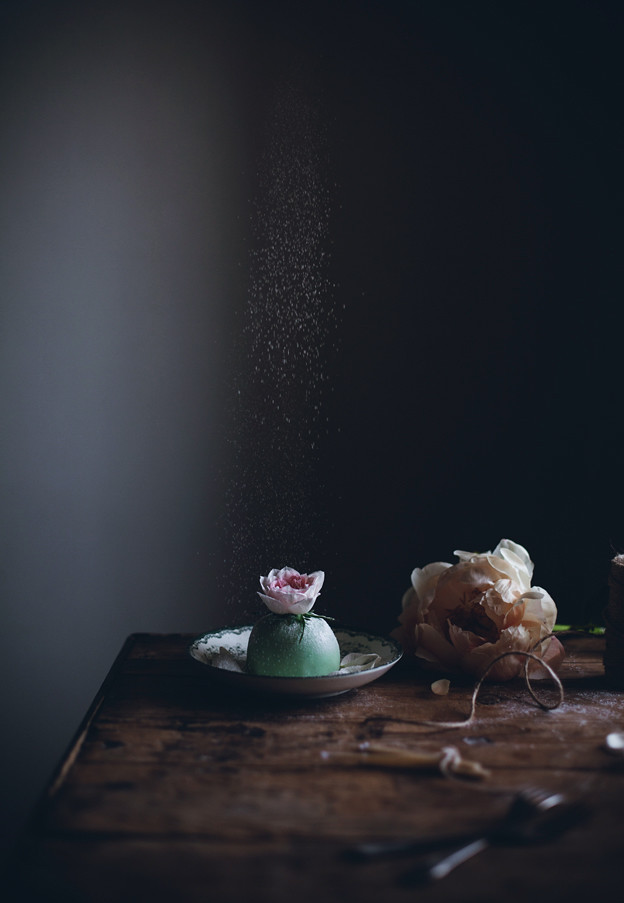
3. Beat 1 2/3 cups cream with 2 tsp sugar until stiff peaks form. Spread a layer of cream over the cakes. Put the cakes in the fridge while you prepare the marzipan.
4. Knead the marzipan with a tiny amount of green food coloring, if desired. Sprinkle some powdered sugar on your work surface to prevent the marzipan from sticking to it.
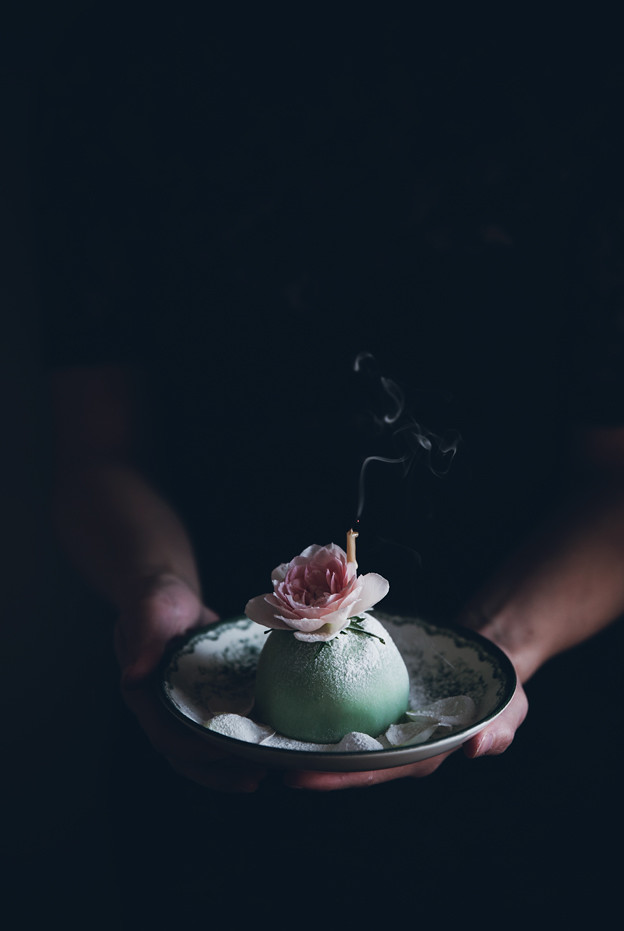
5. Roll the marzipan out very thinly, about 2 mm thick. Cut out rounds large enough to cover the whole cake, my rounds were approximately 14 cm (5.5 inches) across. Drape the marzipan over the cakes and smooth out any wrinkles with your hands. Cut off excess marzipan around the edges. Dust with powdered sugar and decorate with fresh roses or marzipan roses. Store cakes in the fridge.
Underbart!
Absolutely stunning! And I am so in love with your photography style – beautiful.
And you talked recently about the lack of inspiration!? This must be my favorite shoot from you ever (even if I kind of think that every time I see something new you did but really I love this so much!)! So so beautiful Linda, delicate and pretty and oh my, no words… 🙂
Your photography is so stunning!
Kari
http://www.sweetteasweetie.com
These must be some of the most beautiful cakes I've ever seen. Amazing post!
Men guu jag dör så söta! <3
Linda, you are simply the best!!!! Those cakes are soooo beautiful? And your pictures stunning as always! You really make me dream!!! Tons of love my dearest!!!
You are amazing, Linda! Beautiful photos and gorgeous mini princess cakes! cheers from brazil!
The recipe seems fit for more advanced bakers so I might not be trying it soon, but these photos are simply gorgeous, the lighting is just amazing!
These are just fantastic! Well done, I have such cake envy. They are beautiful and I agree, I love mini cakes that are uniform and everyone gets their own. It must be the patisserie lover in me!
I just had to share these on my twitter and facebook, they're adorable.
That is your most beautiful cake to date! Wow, breathtaking…. And it not like your cakes aren't always beautiful! ❤️ Them! x
I just love these little complex cakes. Your recipe actually makes them sound easy, which is incredibly surprising to me. And the combination of green and pink is so unexpected and perfect!
The pictures with the candle smoke and the powder sugar, the flower petals, the colours… Your work is mesmerising!
completely lovely post. i scrolled through many times.. taken in by the petal softness of the images. how i would love to be a princess at this table <3
Your photography is stunning, and I'm so inspired to finally try making princess cakes. Always one of my favorites, we choose a princess cake (without the green dye) for our wedding cake 11 years ago. Our anniversary is later this month, and now I know what to make! Thank you!
what a pretty mini cake, very inspiring!
Always adorable your productions, Linda <3
This is absolutely AWESOME! I've fallen in love with these little cakes!
I didn't know a "princess cake" was actually a thing!!! This is one of the cutest and most beautiful cakes I've ever seen!! AND it's green. My favorite color. I'm feeling quite inspired right now. <33
Simply stunning <3
MAGI, jisses vad du inspirerar!
Hur tror du det skulle bli om man gör receptet till en enda stor tårta? 😀
Tack för en inspirerande blogg och böcker!
Paulina
Hej Paulina! Jag har lite svårt att säga hur proportionerna skulle bli.. Jag skulle nog dubbla receptet på bottnar. Vaniljkrämen kan nog räcka till ett lager i en stor tårta. Men jag är inte helt säker. Hallonfyllningen skulle jag nog också göra mer av – kanske dubbla. Grädden att täcka tårtan med borde också räcka till en stor tårta. Kanske att det behövs något mer marsipan dock. Kanske 400 g 🙂 Berätta gärna hur det går och tack för fina ord! :-*
EEKS these are the cutest things ever! I love the naked ones – very cool to see the process – ! I love how you're embracing all things Swedish lately. I am inspired to make these sweet mini cakes! XO
Ce princess cake est juste magnifique !
VAL ( cookies addicte )
those are absolutely gorgeous <3
I can´t get over how amazing your pictures are 🙂 honestly, so artistic
I LOVE those pictures ^^ great work
Yummy!!
Cake Looks Awesome and tasty!
It's simple recipe.
I will try this recipe today. flowers are beautiful for cake decoration.
thanks
Hi!
Lovely cakes! I’m planning on using this sponge cake recipe for my dads birthday cake this weekend but I don’t have potato starch…. is there anything I could replace it with? I have a good deal of baking ingredients and different floors and stuff…also I was wondering if I could sub some of the normal flour for almond?
Thanks,
Serafina
Hi Serafina! I’m so sorry for the late response! I haven’t tried but cornstarch might work, that would be your best bet anyway. I probably wouldn’t replace some of the flour with almond flour as there is so little of it to begin with, and as this is a very light cake, the almond flour might weigh it down. This is just me guessing though, and I’d love to know if you decided to give it a try! Best, Linda
I just baked the spring cakes. The ratios seemed off to me from the get go but I decided to try it anyways. These turned out absolutely terrible. Photography is great but I am sorry to say the sponge cakes are far from delicious.
Sorry you had problems with the recipe! I’ve tried it several times though so I know it should work. May I ask what the problem was?
I tried to make the cakes exactly as described but after i took them out of the oven they deflated and shrank to half their size.
Hi Shoshana! Sorry to hear about this! It sounds like the egg and sugar batter might have been over beaten, that usually makes it shrink when it comes out the oven!
I made the Princess cakes for my friend’s birthday last week (and also at the prodding of my Swedish partner who’s been stuck in NYC over the pandemic and misses home!) and they turned out delicious!! Everyone loved them and were very impressed and I’ll definitely be making them again!. While they tasted great they did not look perfect like yours, mostly because I found it hard to work with whipped cream as crumb coat/frosting. It was very very soft so when the marzipan went on top of it the cakes became a bit lumpy even though I chilled the covered cakes for about half hour before adding the marzipan. Any tips for working with the whipped cream to make it more sturdy??
Hi Yelena! So glad you enjoyed them despite them not looking perfect! I don’t know which cream you used of course but it might have to do with the fat content of that. I usually work with 40% fat cream which is pretty sturdy but I know it’s not available in everywhere.. I’ve seen starches being used as stabilizers in whipped cream, like cornstarch or powdered sugar. But I haven’t tried it myself!