• Skip to content
  • Skip to primary sidebar

Call Me Cupcake

Sweet food & photography

  • Home
  • Recipes
    • Recipe index
    • Category
      • Christmas
      • Cakes
      • Cupcakes & muffins
      • Pies, tarts, crumbles
      • Ice cream & frozen treats
      • Buns & bread
      • Cookies & candy
      • How To’s
        • How to fill and cover a cake with frosting
        • How to pipe a rose cupcake
        • How to make a lattice pie crust
    • Season
      • Spring
      • Summer
      • Autumn
      • Winter
  • About
    • About Linda
    • FAQ
    • My books
    • Privacy Policy
  • Contact
  • My shop
  • Workshops
  • Links

Vanilla

Apple cobbler with vanilla sauce

October 6, 2017 By linda 29 Comments

I’m still trying to figure out what this delicious thing actually is. Not sure whether it’s a cake, a pie or even a giant cookie. I ended up calling it cobbler because I figured that was the closest thing to it. No matter what it is, it’s friggin good. So good that it’s become a staple in our house. And it’s SO easy to make. You’ll be surprised. The only thing that’s a little bit of work is slicing the apples. But no need to peel the apples, unless you want to, of course. Just imagine how easy it’ll be to make it with berries! Make sure to serve it with homemade vanilla sauce or ice cream. You won’t be sorry!


APPLE COBBLER WITH VANILLA SAUCE

Yields one cobbler, 6-8 servings

This recipe would also be delicious with pears, peaches, plums or berries!

INGREDIENTS

APPLE COBBLER

  • 180 g (1 1/4 cups) all purpose flour
  • 2 tsp. baking powder
  • pinch of salt
  • 150 g (about 1 1/4 stick) softened butter
  • 135 g (2/3 cup) granulated sugar
  • 1 large egg
  • 3-4 (350-400 g) apples
  • 1/2 tsp. ground cinnamon
  • zest from 1/2 orange or lemon
  • 1 tbsp. fresh orange or lemon juice

VANILLA SAUCE

  • 150 ml (2/3 cup) milk
  • 150 ml (2/3 cup) heavy cream
  • 1/2 vanilla bean
  • 3 large egg yolks
  • 3 tbsp. granulated sugar

INSTRUCTIONS

APPLE COBBLER

  1. Preheat oven to 175°C (350°F).
  2. In a medium bowl, stir together flour, baking powder and salt.
  3. In a large bowl, beat the softened butter and sugar until smooth, about 1 minute. Beat in the egg. Add the dry ingredients and stir until a thick but sticky dough forms.
  4. Slice the apples and place in a medium bowl. Add cinnamon, orange/lemon zest and juice to the bowl and stir carefully.
  5. Spread about half of the dough in a 20-22 cm (8-9 inch) pan or skillet using a spoon or spatula. Place the apple slices on top, then dot with remaining dough.
  6. Bake for 30-35 minutes or until the edges have a nice, golden brown color. Let cool before serving with vanilla custard or ice cream.

VANILLA SAUCE

  1. Pour milk and cream into a saucepan. Scrape the seeds out of the vanilla bean and add seeds and bean to the saucepan. Cook over medium high heat until mixture comes to a boil. Remove from heat, put a lid on the pan and let stand for 5 minutes.
  2. Discard the vanilla bean.
  3. Prepare a bowl with a strainer on top. Put the bowl with the strainer inside in an ice bath if you want to speed up the cooling process. Keep this close by during the next steps.
  4. In a medium bowl, whisk together yolks and sugar until mixture lightens slightly in color. Slowly pour about half of the hot milk mixture over the yolks while whisking. Pour everything back into the pan with the rest of the milk mixture. Put the pan over medium and while constantly stirring, heat until mixture thickens.
  5. When the sauce has thickened, pour it through the strainer down into the bowl. Let cool, then cover with plastic wrap and put in the fridge until completely cold.
  • PRINT

Spara
Spara

Spara

Spara

Spara

Spara

Spara

Spara

Spara

Spara

Spara

Spara

Spara

Spara

Spara

Filed Under: Apple, Autumn, Cinnamon, Pies, tarts & crumbles, Uncategorized, Vanilla

Crème brûlée cupcakes

December 20, 2016 By linda 21 Comments

Crème brûlée cupcakes
Crème brûlée is definitely one of my favorite desserts. I know I say that about everything but crème brûlée is just so simple, yet so ingenious. First I thought maybe I was going to butcher a classic by mixing cupcakes and crème brûlée, but after tasting, I can safely say that isn’t the case. Definitely not. However, I do wish that the light had stayed a little longer. I was able to shoot for 10 minutes before I had to crank my ISO all the way up to 4000. Yikes. So frustrating! hence the lack of photos. Spring and summer can’t come fast enough, even if I do enjoy the coziness of this season.. On another note, I used the orange rum vanilla sugar from my previous post for sprinkling and it gives just the right amount of extra flavor to that crispy, caramellized topping. So good!

So this might be my last post of the year. We’ll see. If it is, I’d like to wish you a all Merry Christmas/Happy Holidays and Happy New Year! These cupcakes are kind of perfect for both Christmas and New Year’s Eve. I know I’ll be making them!

Crème brûlée cupcakes

https://www.callmecupcake.se/wp-content/uploads/2016/12/cupcakes.mp4

Crème brûlée cupcakes

Makes 12 cupcakes

The fluffy inside of these vanilla cupcakes goes perfectly with the creamy and crunchy topping. Also, you need a kitchen torch for this recipe!

INGREDIENTS

VANILLA CUPCAKES

  • 100 g (1 scant stick) butter
  • 2 eggs
  • 140 g (2/3 cup) granulated sugar
  • 1/4 tsp. vanilla bean powder (or 1 tsp vanilla extract)
  • 120 g (3/4 cup + 1 1/2 tbsp.) all purpose flour
  • 1 tsp. baking powder
  • pinch of salt
  • 3 tbsp milk or half & half

CRÈME BRÛLÉE TOPPING

  • 300 mL (1 1/4 cups) heavy cream
  • 135 mL (1/2 cup + 1 tbsp) milk
  • 1 vanilla bean
  • 3 egg yolks
  • 55 g (1/4 cup) granulated sugar
  • 3 tbsp cornstarch
  • Demerara sugar, for sprinkling on top

INSTRUCTIONS

VANILLA CUPCAKES

  1. Preheat oven to 175°C (350°F).
  2. Prepare a cupcake pan with 12 cupcake liners.
  3. Melt butter and let it cool.
  4. Beat the eggs, sugar and vanilla until very light in color and texture, about 2-3 minutes.
  5. Mix flour, baking powder and salt in a small bowl. Gently stir the flour mixture into the egg mixture. Add melted butter and milk and stir very gently until batter is smooth.
  6. Divide the batter among the liners, filling no more than 2/3 full (you might have enough batter to make another cupcake).
  7. Bake for 17-19 minutes or until a cake tester comes out clean. Let cool completely.

CRÈME BRÛLÉE TOPPING

  1. Prepare a cold water-/ice bath in a large baking dish or the kitchen sink. Combine cream and milk in a saucepan. Scrape the seeds out of the vanilla bean and add seeds and bean to the saucepan. Cook, stirring constantly, over medium heat until mixture is hot but not boiling. Remove from heat.
  2. Whisk together the yolks, sugar and cornstarch in a medium bowl. Pour the hot cream mixture over the egg yolk mixture, stirring constantly. Remove the vanilla bean.
  3. Return mixture to the saucepan over low heat. Cook, stirring constantly, until mixture thickens. It should become quite thick, almost like softened whipped butter (if you think it feels too loose, keep going for a few more minutes). Do not let it boil or it will curdle. Put the saucepan in the water bath, stirring often until it custard is completely cool. Transfer the custard to a bowl. Cover the surface of the custard with plastic wrap to avoid a skin from forming and store in the fridge until thickened. The custard should hold its shape fairly well on the cupcakes but will still be on the soft side.
  4. Spread or pipe custard onto the cupcake bases. Sprinkle with demerara sugar and burn with a kitchen torch (make sure not to burn the  paper liner!). Sprinkle another layer of demerara sugar on top and burn again. Let cool for 5 minutes, then serve!
  • PRINT

Spara

Spara

Spara

Spara

Spara

Spara

Spara

Spara

Spara

Spara

Filed Under: Christmas, Cupcakes & muffins, Pastry cream, Uncategorized, Vanilla, Winter

Fluffy sponge cake with balsamic strawberries

July 9, 2016 By linda 19 Comments

There is almost nothing that says summer as much as a simple, fluffy sponge cake with cream and strawberries. And while I do enjoy that as it is, in all its simplicity, I wanted to add something. And strawberries and balsamico is pretty much a match made in heaven, I know that since I made a cream soda with balsamic strawberries for a magazine not too long ago. It was honestly one of the best things ever, that I will make many times this summer.


Or let me call it “summer”, so far at least. If you’re from a nourthern
country, you probably know what I mean by that. When I was at the First We Eat workshop in Barcelona in March, Patricia of Sabores y momentos
asked me why I was so obsessed with checking my weather app all the
time. I told her that where I live, we need to make the most out of the
few sunny days we have, because it can literally be weeks until we see
the sun again. And that the weather is definitely a topic of
conversation in Sweden. She told me in her happiest voice “Well, that’s
not a problem here, it’s almost always sunny!”. Well, at least this cake
sure makes it feel like it’s sunny outside.


FLUFFY SPONGE CAKE
WITH BALSAMIC STRAWBERRIES

yields one 24 cm (9.5 inch) cake, serves 6-8

This cake does not keep well in the fridge as the strawberries tend to get a little mushy after a while, so make sure to prepare the strawberries and cream topping right before serving!


Ingredients
For the sponge cake
150 g butter
1 cup (225 g) granulated sugar
3 medium eggs, at room temperature
1 cup (150 g) all purpose flour
1/2 tsp baking powder
1/4 tsp salt
zest from 1/2 lemon
2 tbsp milk

For the balsamic strawberries
300 g fresh strawberries
1 1/2 tbsp granulated sugar
1 tbsp balsamico
pinch of salt
1/4 tsp vanilla powder
zest from 1/2 lemon

For the topping
1 cup heavy whipping cream
2 tsp granulated sugar
Fresh mint leaves

Directions
Sponge cake
1. Preheat oven to 175°C (350°F)
2. Grease a 24 cm (9-9.5-inch) cake pan with a removable bottom. Sprinkle pan with bread crumbs or flour, make sure you get some on the sides of the pan aswell.
3. Melt butter and let cool.
4. Beat the eggs and sugar until lighter in color and texture, about 1-2 minutes. Stir in the melted butter.
5. Mix flour, baking powder and salt in a small bowl. Gently stir the flour
mixture into the egg mixture. Add lemon zest and milk and stir until batter is smooth.
6. Pour the batter into the prepared pan and smooth top with a spatula.
7. Bake for 30 minutes or until a toothpick inserted into the cake comes out clean.
8. Let cake cool for 10 minutes before sliding a knife
around the edge and removing the sides of the pan. Let cool to room temperature.

Balsamic strawberries & topping
1. Hull the strawberries and cut them into thirds lengthwise. Place them in a bowl and toss with sugar, balsamico, salt, vanilla and lemon zest. Cover the bowl and let stand for 30 minutes until the berries release their juices. Toss every now and then.
2. Prick holes in the cake with a toothpick and spoon some of the juices from the berries on top of the cake.
3. Whip the cream with the sugar to soft peaks. Spread the whipped cream on top of the cake. Spoon strawberries on top and decorate with some mint leaves. Drizzle any leftover “juice” on top of the cake.
 

Spara

Filed Under: Balsamico, Cakes, Single layer cakes, Strawberry, Summer, Uncategorized, Vanilla

Butterkaka – cinnamon bun cake with almond paste filling and vanilla custard

March 23, 2016 By linda 27 Comments


I’ve come to realize that the Swedish classics are grossly underestimated, in my book at least. I mean, the cinnamon bun and the semla are definitely on my top ten list of favorite pastries. Maybe even my top five list. So I’m kind of working my way through the classics and thoroughly enjoying it.
If you’re a fan of cinnamon buns (and my guess is that you are), you will looove this recipe. It’s exactly like cinnamon buns except filled with homemade almond paste (the classic recipe uses the “regular” cinnamon bun filling though) and vanilla custard.
And I know that everyone who ever made this recipe in Sweden makes a joke about it. ‘Butter’ means grumpy in Swedish. Tasting this will not make you grumpy. Quite the opposite. On the other hand, Swedish is kind of a funny language. We use the same word for ‘married’ as we do for ‘poison’ (‘gift’). Strange. And yes, I am aware of the fact that ‘kaka’ means something completely different in certain languages.. In Swedish it simply means cookie or cake. Today’s Swedish lesson. But I digress.

You know what is annoying? I was shooting a great tutorial to go with this recipe but when I was done, I realized I had accidentally set my camera on manual focus. Doh. The camera was on my tripod and could barely see what I was doing. Needless to say, I do not like working with a tripod. I do hope the instructions are clear enough anyway!


BUTTERKAKA
WITH ALMOND PASTE AND VANILLA CUSTARD
10-12 buns, makes two 20 cm cakes

Recipe adapted from here

Notes on this recipes
-This recipe does make 12 buns even if there are only 9 pictured. I baked three of them separately so we would have something to nibble on whilst I was shooting! And also, I was eager to use my smaller cast iron pan.
-If you can’t find fresh yeast, I’m sure the dry varieties would also work! I’m not so used to working with dry yeast though. Google is your friend!
-I always use salted butter when baking, if using unsalted, make sure to add en extra pinch where butter is used.
-The custard is enough for a fairly small blob in each bun, if you’re a fan of custard and think you want more, make sure to double the custard recipe. 
-If you can’t find pearl sugar (I’m pretty sure you can buy some at Ikea!), coarse sugar like demerara would also work.

For the dough
20 g fresh yeast
250 ml (1 cup) milk
75 g (5 tbsp) salted butter, softened
70 g (1/3 cup ) granulated sugar
1 tsp ground cardamom
390 – 420 g (2 3/4 – 3 cups) all purpose flour
1/4 tsp salt

For the custard
100 ml (1/3 cup + 1 1/2 tbsp ) heavy cream
3 tbsp milk
1/2 vanilla bean
1 large egg yolk
1 1/2 tbsp granulated sugar
1 tbsp cornstarch

For the almond paste filling
45 g (1/3 cup + 1 tbsp) ground almonds
2 tbsp granulated sugar
2-3 tbsp water
60 g (4 tbsp) softened butter
1/2 tbsp ground cinnamon
pinch of salt

For the eggwash
1 egg
Pearl sugar

Dough
1. Crumble the yeast into a large bowl. Heat the milk to 37°C (98°F) and pour over the yeast. Stir until yeast is dissolved.
2. Add the butter, sugar, cardamom, flour (beginning with the smaller amount and add more if needed) and salt, and knead the dough by machine about 15 minutes, or by hand about 20 minutes, until the dough is smooth and shiny and doesn’t stick to the bowl.
3. Cover the bowl with a clean kitchen towel and let rise until doubled in size, about 60-90 minutes. Meanwhile, prepare the custard and almond paste filling.

Custard
1. Combine cream and milk in a small saucepan. Scrape the seeds out of the vanilla bean and add seeds and bean to the saucepan. Cook, stirring constantly, over medium heat until mixture is hot but not boiling. Remove from heat.
2. Whisk together the yolk, sugar and cornstarch in a bowl until combined. Pour the hot milk mixture over the egg yolk mixture, stirring constantly. Remove the vanilla bean.
3. Return mixture to saucepan over low heat. Cook, stirring constantly, until mixture thickens. It should become quite thick, almost like softened whipped butter. Do not let it boil or it will curdle. Pour into a bowl and let cool. Cover the surface of the custard with plastic wrap to avoid a skin from forming.

Almond paste filling
1. Put the almond flour and sugar in a food processor or blender. Add water (beginning with the smaller amount) and pulse until a paste forms. Add the softened butter, cinnamon and salt and pulse until smooth. Set aside while rolling out the dough.

Roll out dough
1. Heat the oven to 200°C (390°F).
2. Roll out the dough to a large rectangle, about 48 x 25 cm (19 x 10 inches).
3. Spread an even layer of the almond paste filling over the dough. Roll up dough tightly from one long side (so you have a roll that is 48 cm long). Cut roll into 12 slices (you do not need to trim the edges, just put them cut side up in the pan).
4. Prepare two 20-22 cm (8-9 inch) pans. Put a piece of parchment paper inside as pictured, or grease them with butter. Put 6 dough slices in each pan, making sure to not crowd them too much – there should be a little bit of space between them (the picture below is after rising).
5. Cover the pans with clean kitchen towels and let rise for 40 minutes.

Filling the buns + baking
1.  Carefully make a small hole in the middle of each bun, using the back of a spoon or your finger for example. Put the custard in a piping bag fitted with a round tip and pipe a blob of custard in each hole. You can also just spoon the custard into the buns, but piping makes it a whole lot easier.
2. Whisk the egg in a small bowl. Brush the buns with the egg, try to work around the custard filling with the brush. Sprinkle with pearl sugar.
3. Bake the buns in the lowest part of the oven until golden brown, about 30 minutes. If the tops are browning too much, carefully place a piece of aluminum foil where needed.
4. Remove from the oven and let cool under a clean kitchen towel. They’re best eaten the same day, but they’re also quite delicious the next. They also freeze well when baked. Just make sure to let them cool completely before freezing.

Filed Under: Almond, Buns & bread, Cardamom, Cinnamon, Pastry cream, Swedish, Uncategorized, Vanilla, Winter

Vanilla bean cake

August 28, 2014 By linda 61 Comments


Autumn is definitely upon us. The days are getting shorter and the air is getting crisper. It’s sunny. And it rains. Then 5 minutes later, it’s sunny again.
Don’t get me wrong, I absolutely adore autumn, it’s probably my favorite time of the year (ok, I think I say that about all seasons).
I feel more inspired and full of energy than ever, and I can finally wear my favorite clothes again. Yes, I wear clothes during summer too, but way to little for my taste. I always feel like I lose my sense of style (the little that I have..) when it’s too hot outside.
In fact, I feel so inspired and have so many ideas that in the end, nothing gets done. Almost. Or maybe it’s in my head because people around me tell me “But, you get SO much done” and I just shrug my shoulders.. I run around, doing a little bit of this and a little bit of that.
I’m wondering, are there any freelancers reading this? How are you coping with time management?  I’m completely clueless so hit me up with your best tips please!

I actually surprised myself when I took these photos because they are so very summery, and my mood is set to autumn. I guess it’s still summer though, after all, it’s only August.


Vanilla bean cake
Makes one 6 inch cake / Serves 6-8

Recipes from my book Lomelinos tårtor

Ingredients
Cake
50 g (1/2 stick) butter
3 large eggs
1 cup (225 g) granulated sugar
1/2 tsp pure vanilla powder (or seeds from 1 vanilla bean)
1/3 cup + 1 1/2 tbsp milk
1 1/4 cups (180 g) all purpose flour
1 1/2 tsp baking powder
pinch of salt

Vanilla buttercream frosting
300 g butter, softened
1 1/2 – 2 cups powdered sugar
1/4 tsp pure vanilla powder (or seeds from 1/2 vanilla bean) or 1 tsp vanilla extract
1/4 cup heavy whipping cream
pink food coloring, if desired

Directions
Cake
1. Heat oven to 175°C (350F).
2. Butter and flour two 6 inch (15 cm) cake pans.
3. Melt the butter and let it cool.
4. Whip eggs, sugar and vanilla until very light and fluffy, about 5-7 minutes. Heat the milk until lukewarm and add to the egg mixture. Whisk in the melted butter.
5. Mix together flour, baking powder and salt in a bowl. Add dry mixture to the batter and stir until smooth.
6. Divide the batter between the two prepared pans.
7. Bake for 28-30 minutes, then let the cakes cool for 10 minutes in their pans before inverting them onto a cooling rack. Let cakes cool completely.

Frosting
1. Beat butter until smooth.
2. Add powdered sugar and beat until very fluffy and pale, about 3-4 minutes, scraping down the sides of the bowl every now and then.
3. Add vanilla and cream and whip for 30-60 seconds or until cream is fully incorporated.
4. If the frosting is full of air bubbles (because this frosting is fluffy!), stir with a spatula until smooth.

Assembly
1. Divide both cakes in half so you have four layers.
2. Put the first layer on a cake stand or serving platter. Spread about 1/4 cup of frosting on the first layer.
3. Repeat step 2 until you’ve used up all layers.
4. Spread a very thin layer of frosting all over the cake. Put cake in the fridge for 15 minutes.
5. Divide remaining frosting between two bowls and color into two different shades of pink if desired.
6. Spread a thick layer (alternating between the two colors of frosting) all over the cake, then use a large offset spatula two make patterns.
7. Store cake in the fridge (because of the cream) and bring to room temperature before eating.
8. Decorate with edible clover flowers.

Filed Under: Buttercream, Cakes, Layer cakes, Summer, Uncategorized, Vanilla

The best berry pie

July 2, 2014 By linda 48 Comments

There is nothing more satisfying than when you succeed with pie. Pie makes me happy. This pie is the quintessence of summer with lots and lots of raspberries, strawberries and blueberries. Perfect to serve with a scoop, or two, of vanilla ice cream.

I don’t know if it’s just me, but I kind of feel like a criminal when I’m shooting outside. I almost try and hide as much as possible because I feel like people are staring at me. When I shot these images a father and his two sons were walking by. I overheard his kids asking him “WHAT is she doing??”. They’re were on their way towards me to see what I was up to when he stopped them.
I smiled. Children’s honesty and curiosity is really refreshing. Instead of just wondering what I was up too, they were on their way to see what I was doing, without prejudice.

I’m a little sad I didn’t bring company and a blanket for my photo shoot as this beautiful spot would have been so perfect for a picnic. A pie picnic.

https://farm3.staticflickr.com/2926/14370162079_9df2578f54_b.jpg

https://farm3.staticflickr.com/2928/14552397425_d1c72b77fc_b.jpg

The best berry pie

Pie crust
2 1/2 cup + 2 tbsp (375 g) all purpose flour
2 tbsp granulated sugar
1/4 tsp salt
200 g cold butter, in cubes
5-7 tbsp ice water
2 tsp lemon or lime juice
1 egg

Filling
1 kg (2.2 lbs) mixed berries (I used a mix of blueberries, raspberries and strawberries), preferably fresh
1/3 cup all purpose flour
1 tbsp cornstarch
a pinch of salt
3/4 cup + 2 tbsp (180 g) granulated sugar
1/4 tsp vanilla powder (or 1 tsp vanilla sugar)
1/2 tsp ground cardamom (can be omitted)

Egg wash
1 egg
1 tbsp water
a pinch of salt

1/2 tbsp granulated sugar, to sprinkle

Pie crust
Preheat oven to 200°C (400°F).
Mix flour, sugar and salt in a bowl. Add the butter and mix until you get fine crumbs. Add the water (begin with 5 tbsp and add an additional 1-2 tbsp if the dough feels dry in the end), juice and egg and mix until the dough just comes together. Wrap dough in plastic wrap and put in the fridge for at least 30 minutes.

Roll out about 2/3 of the dough on a lightly floured surface and line the bottom of a 24 cm/9 inch pie pan with it. Do not trim the edges yet. Put the lined pan in the fridge. Roll out the rest of the dough and cut out long stripes for a lattice pattern.

Egg wash
Lightly beat egg with water and salt in a small bowl.

Filling
Mix flour, cornstarch, salt, sugar, vanilla and cardamom in a bowl. Put berries in a large bowl, and add the flour mixture. Carefully turn berries berries with a large spoon so they are covered with the flour mixture.
Pour berry mixture into the prepared lined pan and top with pie stripes. “Glue” pie stripes onto the pie crust using some egg wash. Trim edges and use a fork to make a pretty edge, or just pinch edges together. Brush top and edges of the pie with egg wash. Sprinkle some granulated sugar on top.
Bake for 10 minutes at 200°C, then lower temperature to 175°C (350°F) and bake for an additional 50-60 minutes (start checking after 30-40 minutes so the edges don’t brown too much) until filling is bubbly and fragrant. Turn off oven and leave in the oven for an additional 30 minutes to set. Leave to cool completely in room temperature before serving with lightly whipped cream or vanilla ice cream.

Filed Under: Blueberry, Cardamom, Pies, tarts & crumbles, Raspberry, Strawberry, Summer, Uncategorized, Vanilla

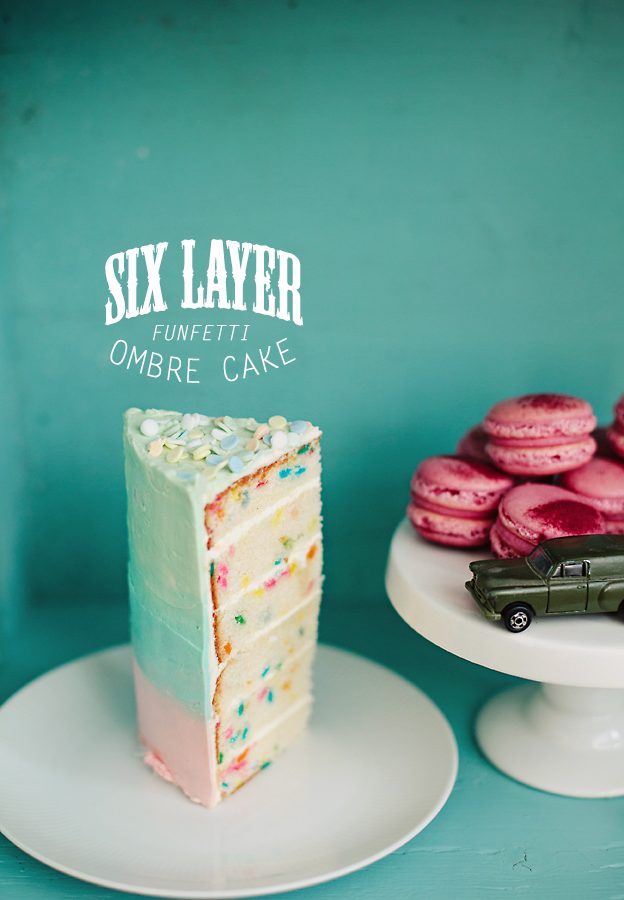
6-layer funfetti ombre cake

March 23, 2013 By linda 121 Comments

Long time no see!
I haven’t blogged for a whole month. I’ve been kind of busy lately, with the new blog and all. Now in English aswell! Or the recipes at least.
Christian appointed this cake to be one of the best cakes ever (and I can tell you he has tasted many) and I was actually so surprised when he said that. I mean yeah, it’s an awesome cake and it looks great, but I’d never expected it to be his kind of cake. Anyway, he thought the texture was fantastic.
We couldn’t eat it all by ourselves though so we gave the leftovers to a friends co-workers. They all agreed the pink frosting was the best (hehe).

You can find the macaron recipe over here!


Vanilla funfetti cake

100 g softened butter
400 ml sugar
250 ml milk
1/2 tsp vanilla extract
500 ml flour
1 tsp baking powder
Pinch of salt
2 large egg whites
100 ml confetti sprinkles

Heat oven to 175°C (350F).
Butter and flour two 5 inch (6 inch works too) baking pans. Set aside.
Beat butter and sugar until pale and creamy, about 3-4 minutes. Add milk and vanilla and mix until smooth. Set aside.
Mix flour, baking powder and salt in another bowl, then add it to the wet ingredients. Add egg whites and mix until smooth. Stir in confetti sprinkles.
Divide batter amongst baking pans and bake for about 30-35 minutes or until a cake tester comes out clean. Let cool.

Vanilla Swiss meringue buttercream
If the buttercream gets soupy or curdled, please please don’t throw it away! I beg of you, just keep whipping and it will eventually come together! 


4 large egg whites
200 g sugar
250 g butter, softened but cool
1 tsp vanilla extract

Put egg whites and sugar in a clean and heat proof bowl. Put the bowl over a sauce pan with simmering water. Whisk the sugar end eggs with a whisk to prevent curdling. The mixture
should be about 65°C, about 140-150 F. If you don’t have a thermometer,
just rub some mixture between your fingers. If the sugar has melted and
mixture is hot, it is done. Remove from heat, whip until you have a white, fluffy
and cool meringue frosting. This step can a few minutes. When bowl is cool to the touch,
start adding the butter, very slowly. Don’t worry if the mixture looks
curdled and soupy, it’s easy to fix! If the buttercream is too cold,
just put the bowl over simmering water for a few seconds and whip
again. If it’s too hot, just put it in the fridge for a few minutes and then
whip. Add vanilla extract and whip
until smooth. Leave the frosting white for now.

Assembling the cake
When cake layers are completely cool, cut them so you have six layers altogether. Put the first layer on a cake stand and spread a layer of buttercream on it. Keep doing this until you’ve used all the cake layers. Spread a thin layer of white buttercream (crumb coating) all over the cake – make it as even as you can. Put the cake in the fridge while you color the rest of the buttercream.
Divide the remaining buttercream between three bowls and color frosting in preferred colors – I used pink, mint green and light turquoise. Frost the cake one color at a time, putting on a good layer of each color. I started at the bottom of the cake with the pink layer but you could start at the top too, if you like. Do take a look at this great video tutorial by Sweetapolita to see how she does it!
Sprinkle extra confetti sprinkles on top.

Filed Under: Cakes, Layer cakes, Spring, Uncategorized, Vanilla

Primary Sidebar

Linda Lomelino

In season

Gingerbread Cookies

Homemade Chai Concentrate + Chai Latte

Gingerbread Village Cake

A trip to Norway + Brownies with salted caramel and toasted meringue and a gingerbread bundt cake

Subscribe by e-mail

Footer Widget Insta

Copyright © 2019 · Call Me Cupcake · Linda Lomelino