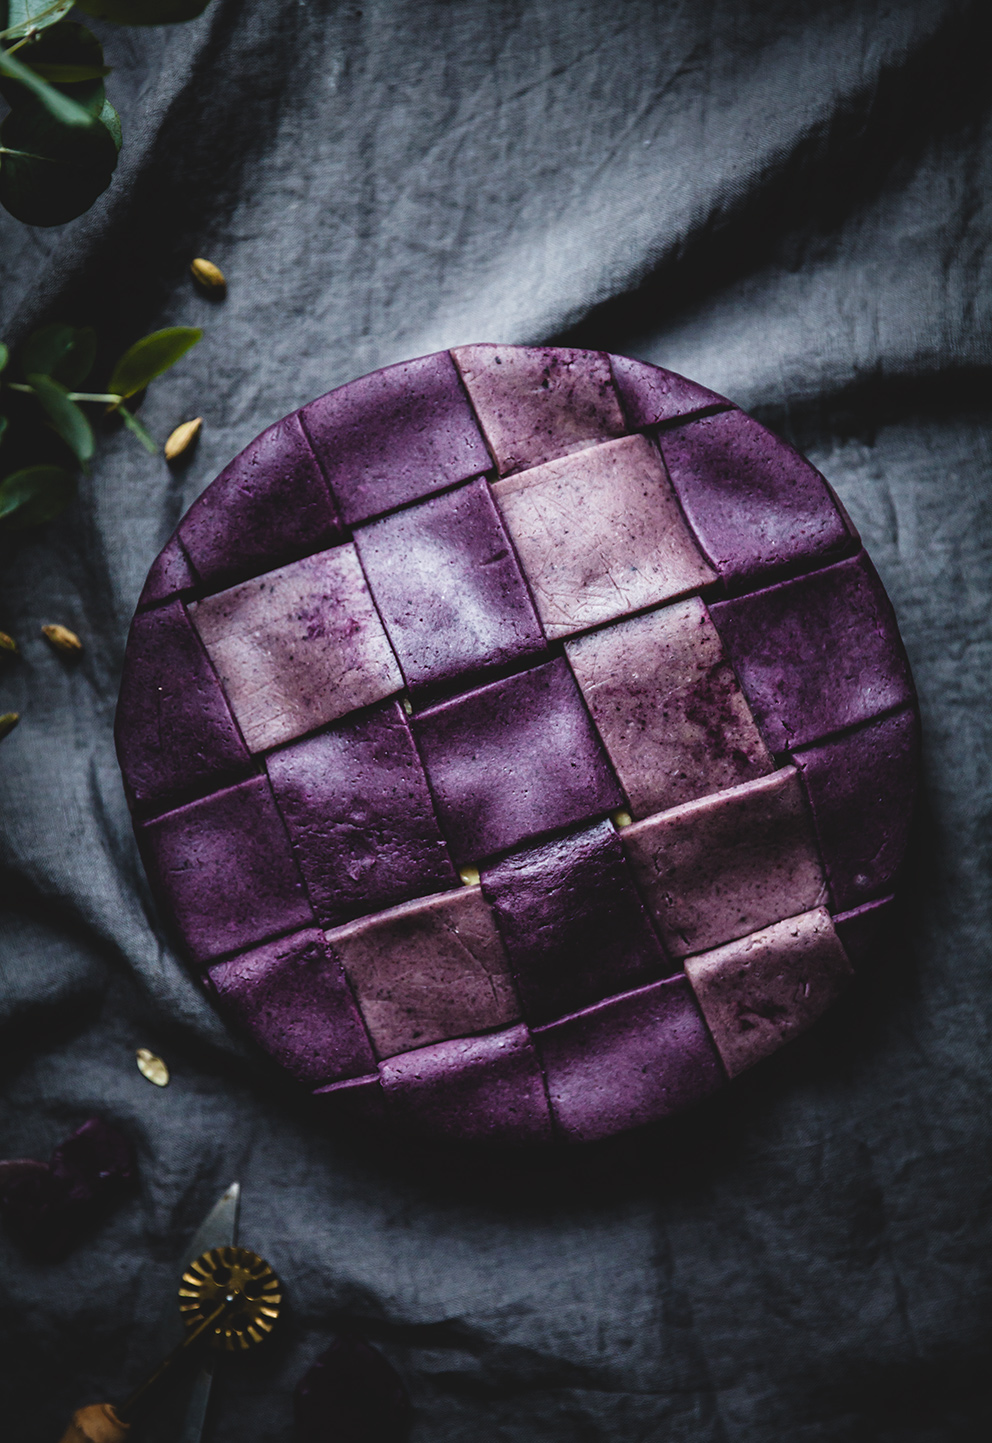
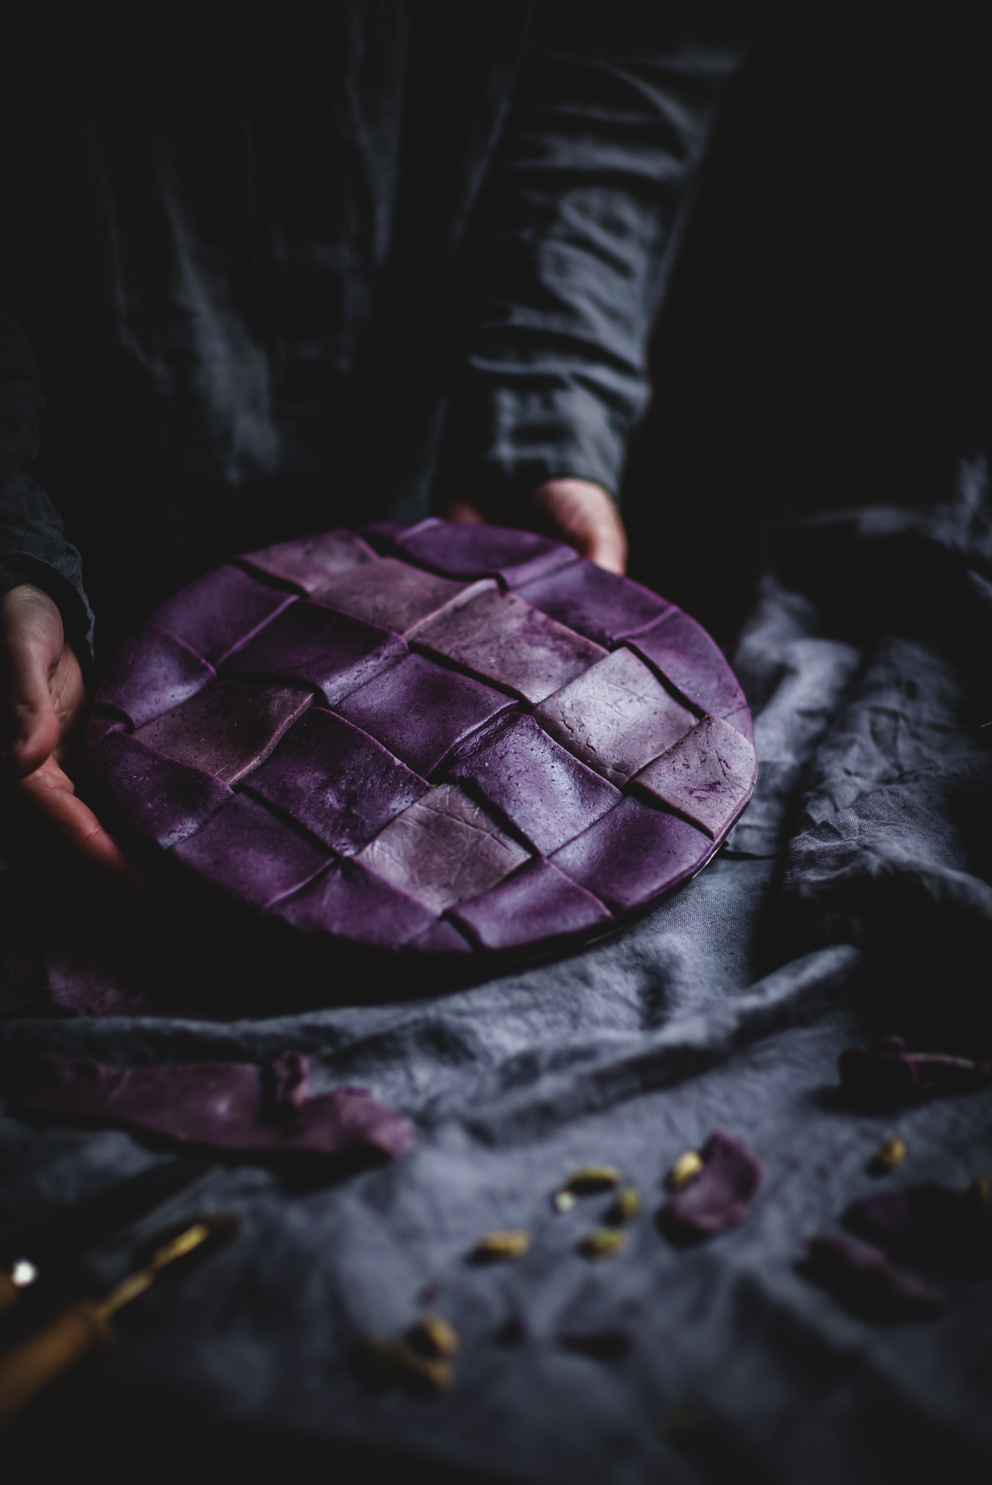
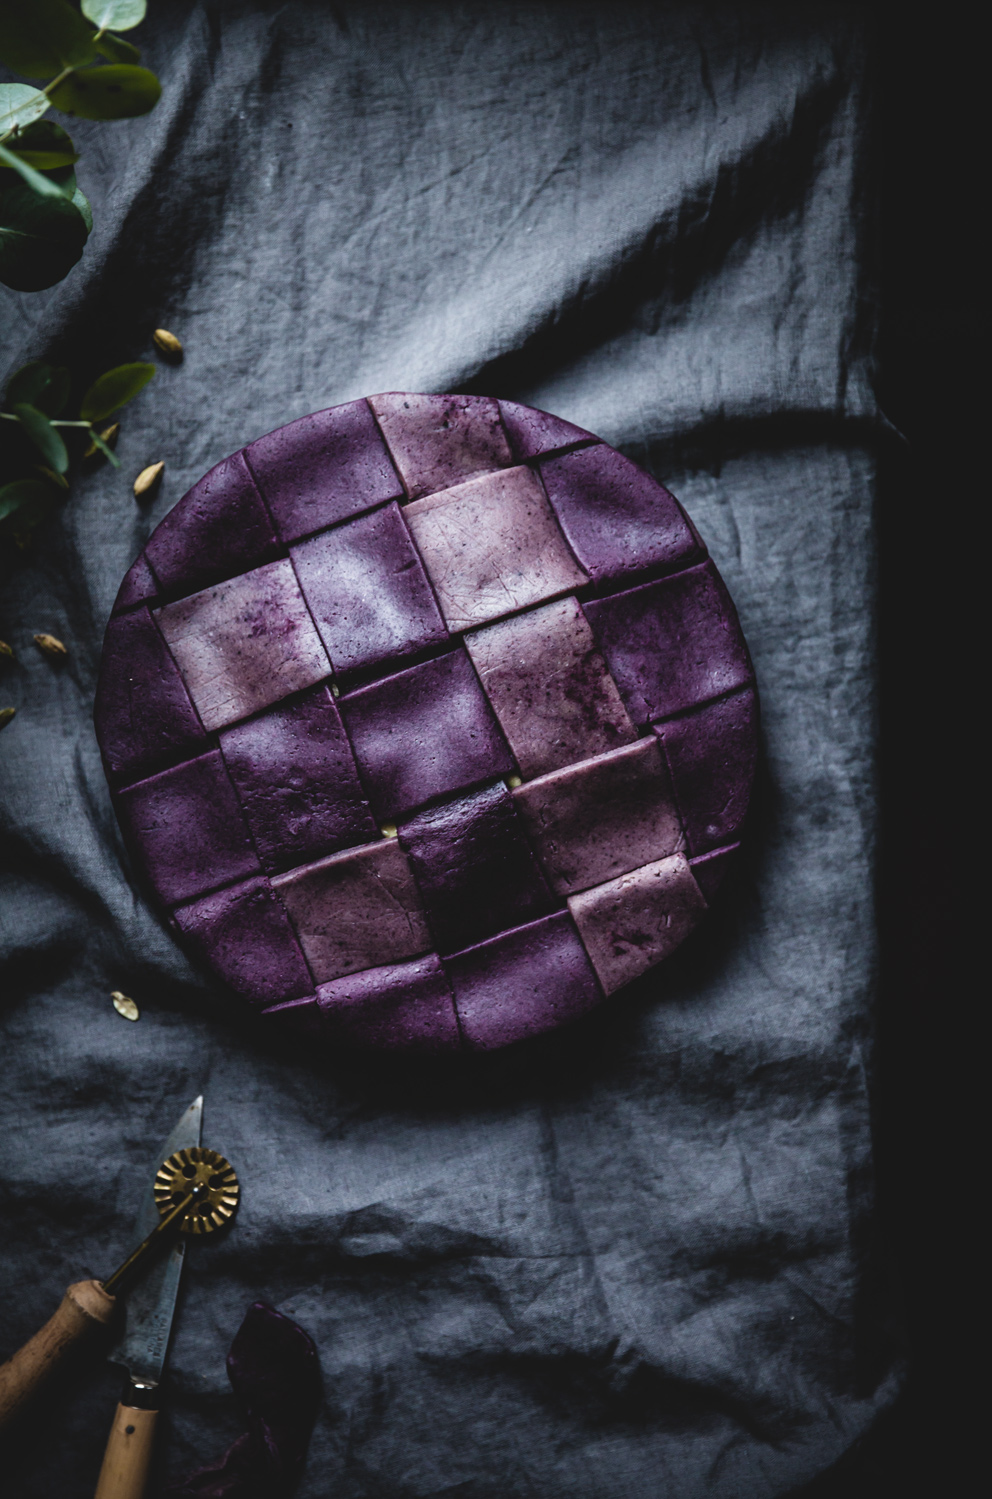
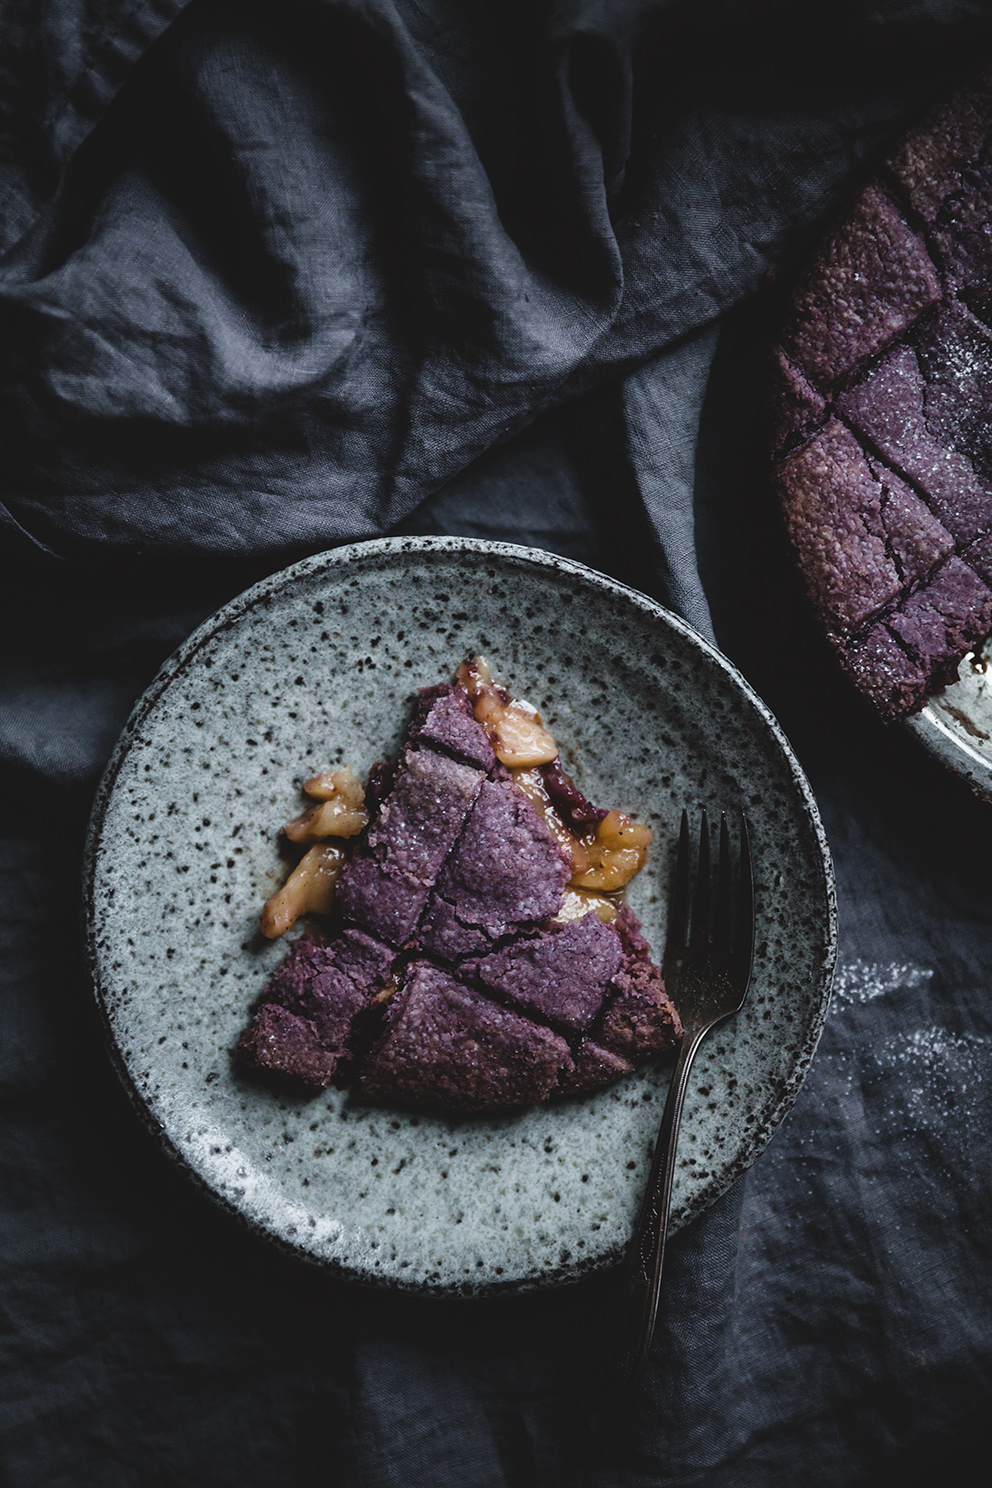
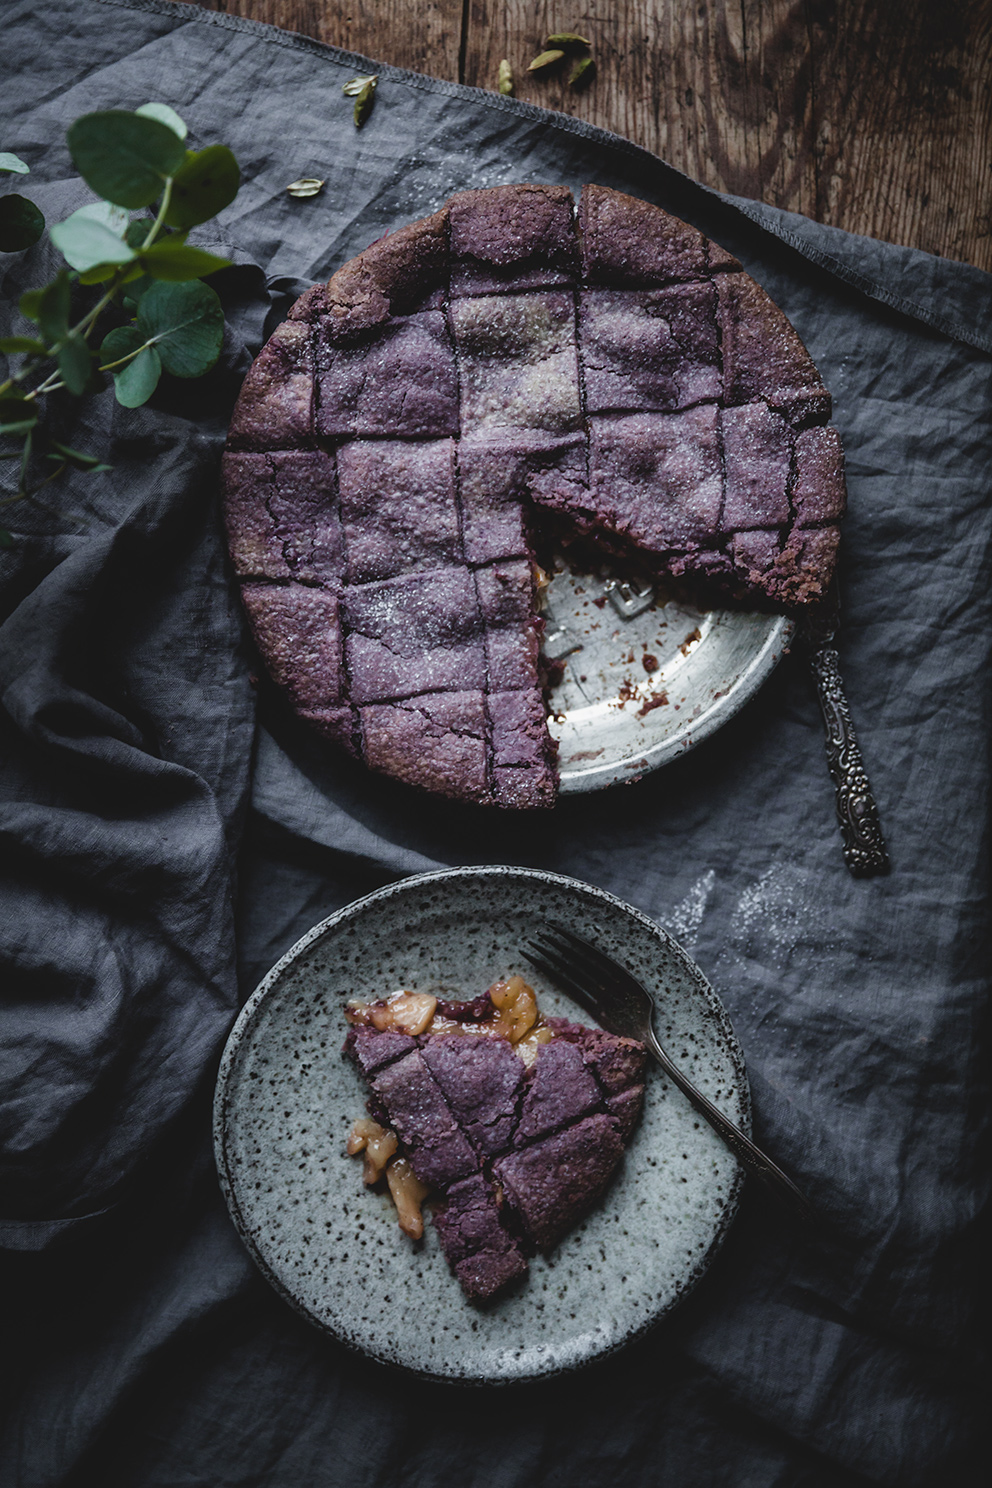
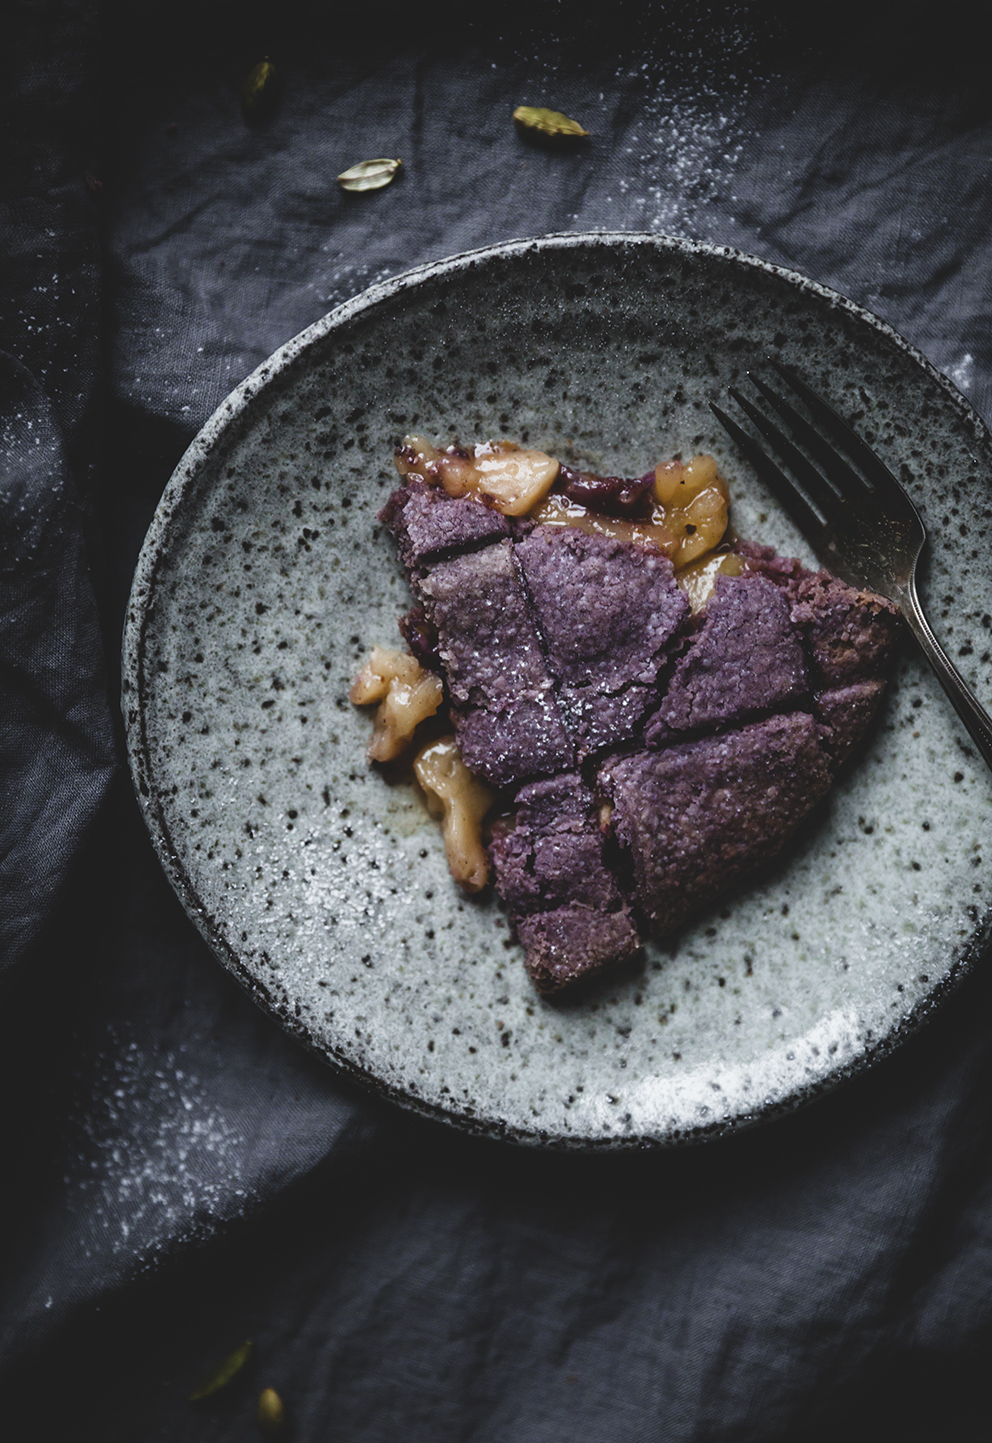
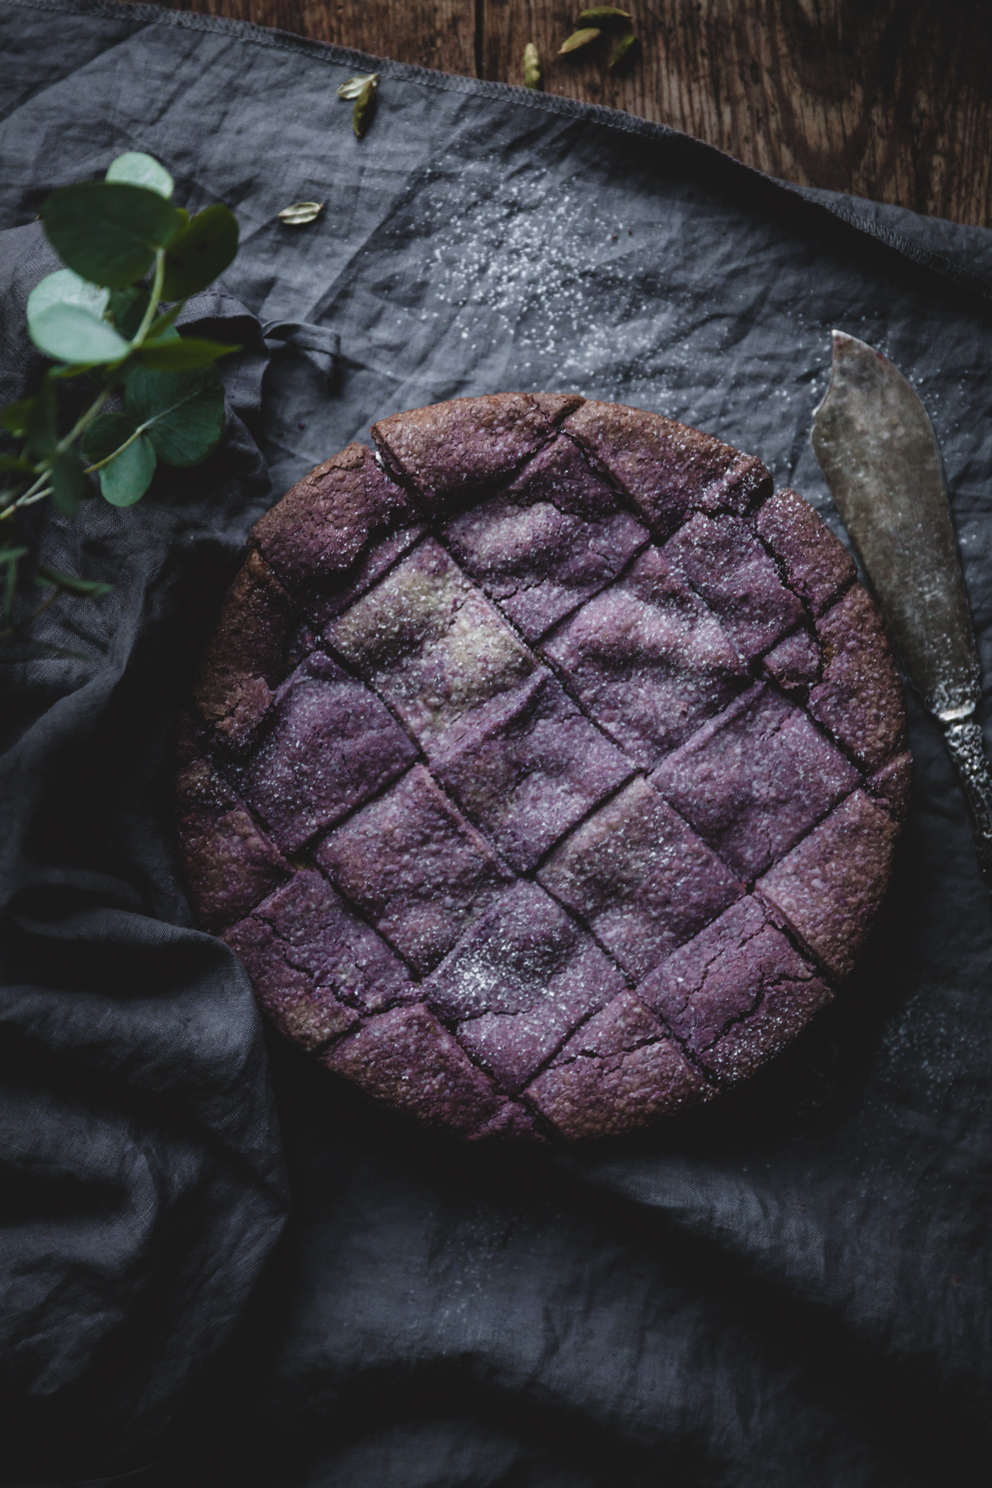
Purple pie crust. It’s a thing of beauty. To be honest I had no idea if it would even work! But I knew I had to give it a shot as soon as the idea popped up in my head. And since we have some beautiful winter apples, I figured that would be the best way to go. Because you can never really go wrong with apple pie, am I right?
Some tips if you’re thinking about making this pie, or pies in general. Make sure not to brush the pie with any egg wash if you want to keep the purple color. It won’t be as impressively purple after baking, but as you can see it will keep some of the color! I wasn’t really thinking too much during my first try, so I brushed the pie with egg white.
Needless to say, the pie browned a lot and you could see very little of the purple. The second time, I left it as is (as you can see in the photos) but used a little less (maybe 1 1/2 tbsp.) blueberry powder so the pie came out a lot lighter. Next time, I’ll use more blueberry powder and I might brush it with a syrup right after baking, like I did HERE. I bet that would be delicious and it would also give a nice sheen to the pie!
Blueberry powder is easily accessible in Sweden, where you can find it in super markets and in health stores. I used the brand Kung Markatta, and it gave this beautiful color. Different brands can give slightly different colors of purple/red. The blueberry powder doesn’t really give any blueberry flavor, and it also doesn’t affect the consistency of the crust.
You can totally make this pie without the blueberry powder too! It’ll still be SO incredibly delicious. I say apples and oranges were meant for each other. You can totally use lemon zest and juice too, if that’s more up your alley. Make sure to use apples that are not overly ripe. That’ll make the filling mushy. Oh, and the pie dough can be made up to a day ahead.
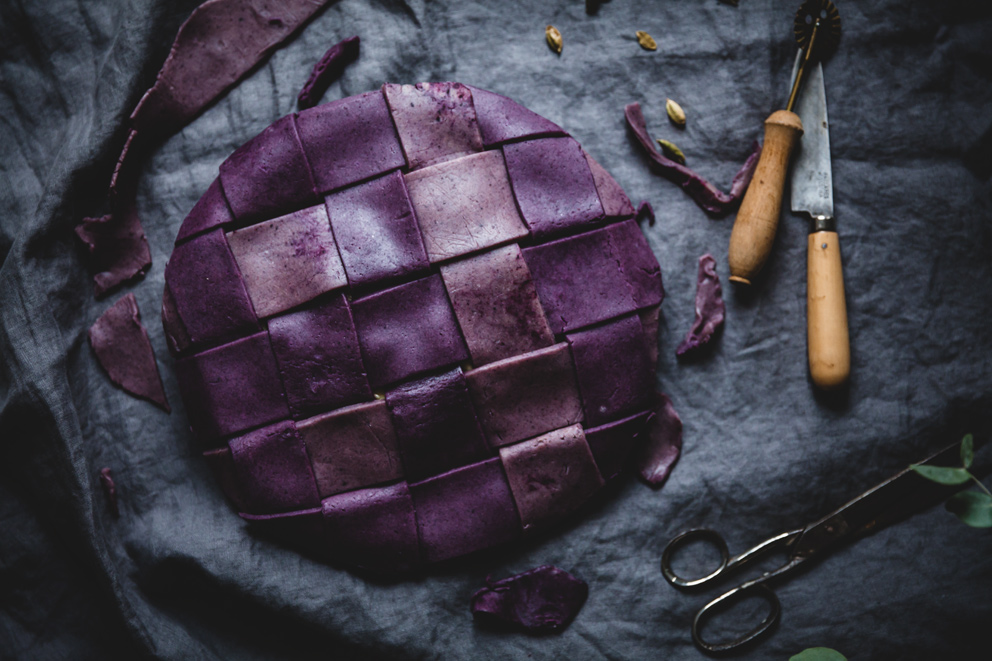
If you’re making a very tight lattice like I have here, make sure there are still some small holes for the filling to seep through, or your lattice might puff up during baking and break. And always let the pie cool completely after baking to make sure the filling firms up. If you want to serve the pie warm, re-heat each individual slice instead.
I think that’s about it.. although I can go on and on about pies!


APPLE PIE WITH A PURPLE BLUEBERRY CRUST
Makes one pie
Make sure to read the post above for tips and tricks on this recipe!
INGREDIENTS
BLUEBERRY CRUST
- 2 tbsp. freeze dried blueberry powder
- 3 tbsp. cold water
- 300 g (2 cups + 1 tbsp) all purpose flour
- 2 tbsp. granulated sugar
- 1/2 tsp. flaky salt
- 250 g (2 sticks plus 2 tbsp.) very cold salted butter
- 1-3 tbsp. ice water (as needed)
APPLE FILLING
- 1 kg apples (about 6, depeding on size)
- 100 g (scant 1/2 cup) granulated sugar
- pinch of salt
- zest and juice from one small blood orange (about 3 tbsp. juice)
- 3/4 tsp. freshly ground cardamom
- 1/4 tsp. ground cinnamon
- 25 g salted butter
- 2 tbsp. water
- 2 tbsp. cornstarch
INSTRUCTIONS
PIE CRUST
- Stir together blueberry powder and water in a small bowl. Set aside. Mix together flour, sugar and salt in a large bowl. If you have one, use a cheese slicer to slice the butter thinly – if not, you can dice the butter with a knife. Add the sliced or diced butter to the dry ingredients, and using your fingers or a pastry cutter, cut or rub the butter into the flour mixture until dough is crumbly but there are still some small visible pieces of butter.
- If you want the dough to have a completely smooth purple color – place the mixture in a food processor, add the blueberry powder and water mixture and pulse until just smooth. You might need too add an extra tablespoon or so of ice water if the dough is too dry. Make sure not to overmix the dough!
- Divide the dough into two pieces, one slightly bigger than the other (the bigger one will be for the lattice top). Place each piece of dough between two pieces of plastic wrap. Flatten into discs using a rolling pin. Place in the fridge for at least one hour.
APPLE FILLING
- Peel and core the apples and slice them in about 6 mm (1/4 inch) thick slices. Place the slices in a bowl and add sugar, salt, zest, juice, cardamom and cinnamon. Gently fold so that everything is distributed evenly. Let stand for about 5-10 minutes or until the apples start releasing liquids. Gently stir every now and then.
- Melt the butter in a large saucepan, and with the pan over medium heat, add the apple mixture and cook, stirring often, for about 2 minutes or until the apples release more liquid. Stir together the water and cornstarch in a small bowl, and add to the saucepan. Stir constantly until liquids thickens, about 1 minute. Spread filling onto a large plate or a wide bowl and let cool completely.
ASSEMBLE AND BAKE
- Preheat oven to 200°C (390°F).
- If the dough is very cold and hard, leave it in room temperature for a little while before rolling it out. Roll out the smaller piece of dough to a large circle on a lightly floured surface, about 1/8 – 1/4 inch (3-5 mm) thick. Make sure to roll and turn the dough so it doesn’t stick – or roll the dough out directly onto a piece of baking paper.
- Using the rolling pin, transfer the dough to a 8-9 inch pie pan. Trim the edges of the crust, but make sure to leave a little overhang if you want to crimp the edges. Set aside.
- Roll out the second piece of dough, and cut out 10 strips (or the desired amount) of dough using a knife or pizza cutter.
- Spoon the cooled filling into the pie pan. Place the strips in a lattice pattern on top of the filling (see a video on how to make a lattice top in THIS POST). Trim excess dough around the edges using a knife or kitchen scissors.
- Place the pie in the freezer for 15 minutes.
- Remove the pie from the freezer. Place a baking sheet or a piece of baking paper (to catch drips from the pie) on the lowest rack of the oven. Bake the pie for 10 minutes at 200°C (390°F), then lower to 175°C (350°F) and bake for an additional 35 minutes. If the edges are browning too much, cover them loosely with aluminum foil. Turn the oven off and leave the pie in the warm oven for an additional 10 minutes. Remove the pie from the oven and let cool completely before serving with sweetened whipped cream or vanilla ice cream.

Amazing crust, the color is beautiful. Your art with pies let me without words.
Happy New Year Dear Linda.
Ophelie
Thank you so much dear Ophelie! Pies are soo much fun to make. Wishing you a Happy New Year too! xx
I have a recipe that calls for vitamin c tablets or Fruit Fresh to preserve the color of beets that are used in th recipe. I wonder if you could try adding that to your crust to prevent the color loss.
That’s an idea! But sounds like it might not work, I guess the color loss has to do with the baking process. But I’d love to know if you give it a try!
Oh my goodness, that colour is just too beautiful. I imagine it would be beautiful with any berry powder but blueberries are so stunning, what a wonderful idea! A real showstopper pie.
Thank you so much Alexandra! I totally agree, blueberries have such a vibrant color. I need to try other berry powders too, I think! x
This blueberry crust is so original – I’ve never seen anything quite like it, and I’ve received blueberry and cranberry powders as gifts recently, so I am definitely earmarking this to riff off! Thank you for sharing this!
Thanks so much Chloe! It does look stunning, doesn’t it?! Ohh, cranberry powder, I’ve never tried that. How exciting!
What would be the glaze recipe you’d do on top? You should add it to the recipe as an (optional). Is the extra B.B. powder adjusted in the recipe?
Hi Darren! I didn’t want to add the egg wash to the recipe as I thought it might be a little bit confusing. You can brush it with an egg mixed with a splash of milk, cream or water and a pinch of salt! For the unbaked pie in the photos, I used 2 tbsp blueberry powder. The baked pie you can see in the photos, I used 1 1/2 tbsp. Hope that helps!
wow amazing BLUEBERRY CRUST, APPLE FILLING. really awesome
You have one of the most beautiful and amazing photos I have ever seen.Always looking forward your new post.
Aw, thanks so much Linda, that makes me so happy to hear!
Such a good idea, I have never thought about adding color to a pie crust before! It’s lovely. You are certainly the Queen of Pies!
Thank you sooo much Karie! It was super fun to make and I had no idea if it would work.. I’m going to try with raspberry powder next time 🙂
Wow, that looks so tasty. Love this recipe.
Thanks so much! 🙂
So no par-baking the bottom crust? I’m about to give it a go. If I don’t comment again it would have gone very well. 🙂
Hi Daisy! This is completely up to you of course, but I never par bake the crust in double crusted pies or galettes 🙂 Hope you like it!
This is seriously beautiful! Do you think theres anyway to actually give the crust a slight blueberry flavor? Like using extract or something similar?
Thanks, Julie! I’ve never worked with blueberry extract so I can’t be sure.. possibly replace some of the water with blueberry extract? Or add some blueberries to the pie 🙂
That looks stunning! And I bet it tastes fantastic too!
Lesley xx
myextraordinarylife
Thank you so much Lesley! It was delish! xx
Semplicemente splendida e sicuramente ottima,vorrei provare a farla ma non riesco a trovare la polvere di mirtilli qui in Italia…grazie Linda per le tue favolose ricette,sono felice di averti trovato.Gaby
Hi Linda,
I would like to know can we make Blueberry powder at home? I am in Canada and I cannot find it in my area. Apple pie with this colour looks amazing so I want to try it.
Thanks
Hi Patel! You could definitely make your own, but I’ve never tried making it myself 🙂 Let me know how it turns out!
Hey Patel, I’m in Canada as well and I was able to find it at a Bulk Barn near me! It was quite expensive though, and when I asked about it they did mention that it could be difficult to find.
I dehydrated blueberries to make my own powder. It was worth the effort. Mine was not as dark as yours. But beautiful.
Ahh that’s so exciting! I’ve never tried it 🙂 Glad to hear it worked!